

Due to its close connection with Apple and iOS devices, the Swift programming language is one of today’s most popular languages for iOS developers, software engineers and programming enthusiasts. While Apple has designed Swift to be a relatively easy language to learn, it offers a level of complexity for those who choose to master it.
We’ve written this article to serve as a single touchpoint for initial Swift code development. All of the advice below is designed to help developers using Swift for the first time, as well as experienced developers looking to better understand Swift and its applications. Professionals at a Swift app development company might also find these fundamentals useful when onboarding new team members.
Throughout this article, we’ll outline many of Swift’s key concepts while sharing real-world coding examples. But before we do, it’s worth detailing the best use cases for the following Swift code examples.
What is Swift Used For? A Brief History of the Programming Language and the Best Applications for Swift Code
The Swift programming language was created in 2010 by Chris Lather. From its inception, it was designed to serve as a general-purpose language for Apple devices. Since then, Swift has undergone multiple updates and iterations, the most recent of which was Swift 6.0, released in September 2024.
These are the core use cases for Swift today:
1. iOS and macOS App Development
Since it was first designed, the main use case for Swift has been to build various different applications for Apple devices. That includes apps for iPhones as well as iPads and Macs. Swift is heavily entwined with Mac development to the point where it serves as the default language for developing apps in Xcode.
Some of today’s most popular iPhone apps were built using Swift: Airbnb’s iOS app, as well as LinkedIn, Lyft and many others. If you work in iOS app development, you should know how to code with Swift.
2. watchOS and tvOS Development
Alongside developing apps for Apple’s core devices, Swift is also used to develop apps and solutions for Apple’s further suite of solutions. This includes apps for both Apple Watch and Apple TV. Designing solutions for these apps with Swift allows them to seamlessly integrate with Apple’s wider ecosystem.
3. Server-side Development
One of the core features of Swift is its ability to function cross-platform on both Windows and Linux. This means it’s often used as a server-side language in a variety of use cases, like building high-performance web APIs and backend services. Apple, as well as other major companies like IBM, have used Swift in the past to create scalable web applications.
4. Game Development for Apple Platforms
Swift can also be an option for game developers who are designing games for iOS devices. While it doesn’t offer quite as much flexibility as some more complex coding languages for games, like C/C++, Swift can be used to code casual games for mobile applications.
5. Cross-platform Development
Now that Swift works across both Windows and Linux, it’s also a reliable option for cross-platform development. Developers design applications that can operate across both iOS and Android Linux operating devices or devices that run on Windows. The potential for cross-platform development is further supported by the fact that Swift is still an open-source language, with many developers sharing their expertise.
Swift Code Examples: Understanding the Fundamentals of the Swift Programming Language
Let’s review some of the fundamentals of Swift for anyone just getting started with using the language to write code for iOS apps.
You first need to understand that Swift is a statically typed and type-safe language. Statically typed means that data types written using Swift are only defined during compile time, and they can’t change during runtime. This makes it slightly harder to use but does mean Swift is more reliable and often performs better than dynamically typed alternatives. Meanwhile, Swift being a type-safe language means you cannot mix different data types in an operation unless explicitly converted. This is designed to avoid type errors.
Basic Swift Code Examples: Variables, Constants and Data Types
When you’re starting out with Swift, understanding variables, constants, and data types is crucial for writing efficient code.
Let’s start with variables and constants. In Swift, you use var to declare mutable (changeable) variables and let to declare immutable (constant) variables. Here’s an example of how these descriptive variable names work in practice:
1var name = "Alice" // A variable (can be changed)
2let age = 25    // A constant (cannot be changed)
3
4
5name = "Bob"  // Allowed, since name is a variable
6// age = 30  // Error! 'age' is a constant and cannot be changed
Changeable variables written using var can be changed – in this example, the name in the first line of code is Alice, and it’s possible to change it to Bob. Meanwhile, you can use let to declare immutable variables that can’t change – in this example, the age is set at 25, and when you attempt to change the age to 30, you receive an error. If you wanted to change the age as well as the name in this example, both variables would need to begin with var.
To keep your code clean, it’s worth using the let keyword in your type string by default to declare multiple constants throughout your source code unless you know a variable definitely needs to change.
What about data types? Swift provides programmers with built-in data types, and because it’s type-safe, you can’t mix different data types unless they’ve been explicitly converted. Here’s a quick table showing some of the most common data types in Swift:
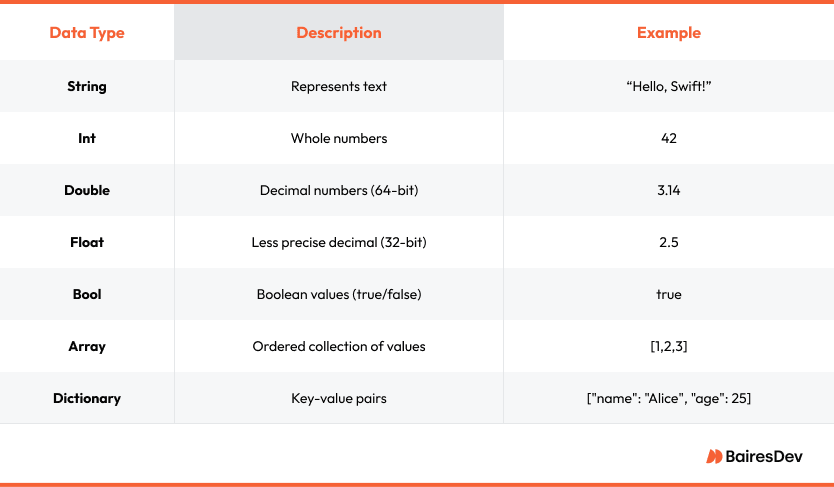
Swift allows you to access type inference, which is where Swift designates data types automatically. This can result in cleaner, faster code, but there are cases where it’s better to explicitly type yourself for clarity. Here’s a real-world example of some of these data types being applied within Swift code:
1let message: String = "Hello, Swift!"
2let pi: Double = 3.14159
3let isSwiftAwesome: Bool = true
4let numbers: [Int] = [1, 2, 3, 4, 5]
5let user: [String: Any] = ["name": "Alice", "age": 25]
As you can see in this example, each data type has been made a constant because they start with a let keyword.
Understanding each of these data types, as well as applying variables and constants, is one of the core fundamentals of effective Swift coding. Once you better understand them, you can move on to how Swift handles control flow.
Basic Swift Code Examples: Control Statements
Swift uses control flow statements for program execution, much like many programming languages. The most common of these are if and else statements, as well as switches and loops including for, while, and repeat-while.
Here’s a quick summary of each of these statements and their purpose during code execution, such as statements that work off of Boolean conditions:
These are fairly basic examples of control statements within Swift, and if you’re familiar with programming you should understand how they work already. There are, however, some more advanced control statements you can use to create more dynamic code.
One example of this is using the where clause to filter values while iterating over a sequence. Here’s one of our real-world Swift code examples showing how this works in a case where you need to filter even numbers:
1for number in 1...10 where number % 2 == 0 {
2 print("\(number) is even")
3}
4// Output:
5// 2 is even
6// 4 is even
7// 6 is even
8// 8 is even
9// 10 is even
Another more advanced control statement targeting loops is the process of breaking out of loops early once a certain condition has been met. Here’s an example where the break statement is used to break a loop once a specific value has been found:
1let numbers = [3, 7, 15, 22, 30]
2for num in numbers {
3 print("Checking \(num)...")
4 if num > 20 {
5 print("Found a number greater than 20! Stopping.")
6 break
7 }
8}
9
10// Output:
11// Checking 3...
12// Checking 7...
13// Checking 15...
14// Checking 22...
15// Found a number greater than 20! Stopping.
Further to these techniques, you can also create more advanced switch statements and nest loops within each other when handling multi-dimensional data. Experiment with different control statements to make your code more efficient.
Basic Swift Code Examples: Functions and Closures
The final basic Swift coding fundamentals you need to understand when starting out are both functions and closures.
Functions are named blocks of Swift code that perform specific tasks. You can apply input parameters to your functions to make them more dynamic, and they can also return values. Here’s an example of a basic function in Swift:
1func sayHello() {
2 print("Hello, Swift!")
3}
4sayHello() // Output: Hello, Swift!
Now, here’s an example featuring input parameters:
1func greet(name: String) {
2 print("Hello, \(name)! 👋")
3}
4greet(name: "Alice")
5// Output: Hello, Alice! 👋
This more advanced function changes the greeting name and adds it to the output. By adding more complex parameters like this to your Swift functions, you can create far more dynamic outputs for your Swift code.
Closures work slightly differently. Instead, they are anonymous functions that can be assigned to variables or passed on as arguments. They’re always written using {}. Just like with functions, you can make your closures more dynamic by adding parameters to them. Here’s an example of a basic closure in Swift:
1let sayHello = {
2 print("Hello from a closure!")
3}
4sayHello() // Output: Hello from a closure!
Now, here’s a more advanced closure with added parameters, as well as a return value:
1let multiply: (Int, Int) -> Int = { (a, b) in
2 return a * b
3}
4print(multiply(4, 5)) // Output: 20
Here’s a table showing some of the main examples of functions and closures and how complex you can make them when coding with Swift:
| Feature | Example |
| Basic Function | func greet() { print(“Hi”) } |
| Function with Parameters | func add(a: Int, b: Int) -> Int { return a + b } |
| Default Parameter | func greet(name: String = “Guest”) |
| Returning Multiple Values | func getUser() -> (String, Int) { return (“Alice”, 25) } |
| Variadic Parameters | func sum(_ numbers: Int…) |
| Closure (Basic) | let greet = { print(“Hello”) } |
| Closure with Parameters | let multiply = { (a, b) in a * b } |
| Short Closure Syntax | let sorted = numbers.sorted { $0 < $1 } |
| Capturing Values in Closures | let increment = counter(); increment() |
Once you understand all of these Swift fundamentals, you should be able to start coding with Swift more effectively. At this stage, it’s worth moving on to some more advanced forms of Swift code.
Swift Code Examples: Advanced Techniques for More Effective Code
For the first more advanced Swift code examples, we’re going to look back at functions. Swift includes several higher-order functions, which, when used, can make your code more readable. This is particularly important when working with collections, which we’ll explain first.
Advanced Swift Code Examples: Understanding Swift Collections
Collections are Swift data types designed to store values; this means they hold multiple generic values within a single value. There are three main examples of collections within Swift.
Arrays are the first of these, and they store ordered data, such as a sequence of numbers. Dictionaries are the second, and they are unordered elements; for example, you can create a “user” dictionary made of several data points, like a name, age and location. Finally, Sets are unordered collections of unique data. These differ from Dictionaries because they’re not linked by key values, which Dictionaries are.
Here’s a list of these three Swift Collections and when you should use them:
| Collection Type | Characteristics | Use Case | Example |
| Array | Ordered, indexed, allows duplicates | When you need to preserve the order of elements | Storing a list of scores, names |
| Dictionary | Key-value pairs, unordered | When you need to map unique keys to values | Storing user details (e.g., username -> user info) |
| Set | Unordered, unique values | When you need to enforce uniqueness or test membership | Storing unique IDs, tags, or categories |
Advanced Swift Code Examples: Higher-order Functions
All of the below higher-order functions provide an expressive and concise way to work with data when using Swift, especially when combined with closures and collections. Understanding how to use them effectively is essential for iOS developers working with Swift.
The higher-order functions we’re going to explain are map, filter, reduce, and compactMap.
The first of these, map, applies a transformation to each element in a collection and returns a new collection. Here’s an example of how this works:
1let numbers = [1, 2, 3, 4, 5]
2let doubledNumbers = numbers.map { $0 * 2 }
3print(doubledNumbers) // Output: [2, 4, 6, 8, 10]
This can be useful if you need to quickly manipulate every element in a collection. It’s also useful when handling large amounts of data; for example, if you have a huge list of articles on your UI and you need to collect all of their titles.
The filter function allows you to filter out elements from a collection that don’t satisfy a given condition. This is very useful for adding search functions or for extracting subsets of data. Here’s a real-world Swift code example of how this function works:
1let numbers = [1, 2, 3, 4, 5, 6]
2let evenNumbers = numbers.filter { $0 % 2 == 0 }
3print(evenNumbers) // Output: [2, 4, 6]
Meanwhile, the reduce function combines all elements of a collection into a single value. This is used for combining several values into a single result or to flatten a large amount of data into a single string. Here’s how it works:
1let numbers = [1, 2, 3, 4, 5]
2let sum = numbers.reduce(0) { $0 + $1 }
3print(sum) // Output: 15
Finally, the compactMap function works in a similar way to map, except it removes any nil values from the result. This makes it very useful if you need to clean up your data or remove any invalid information like so:
1let strings = ["1", "2", "three", "4"]
2let numbers = strings.compactMap { Int($0) }
3print(numbers) // Output: [1, 2, 4]
Learning how to use each of these higher-order functions in Swift will help you develop more complex iOS applications. They’ll also help you sort, filter and remove data from your code, which can lead to more efficient Swift code and cleaner coding practices.
Working Efficiently with Swift Code Examples
By using the above Swift code examples for both fundamental Swift concepts and some more advanced functions, you’ll have a strong foundation from which to continue to develop your expertise in Swift coding practices.
As iOS apps become more advanced and users become more demanding, it’s essential that you continue to refine your Swift coding skills so you can continue to create advanced applications in the future.
FAQ
What are some techniques I can use to improve my Swift programming skills?
Learning how to use Swift libraries can make coding with Swift much easier. These libraries include detailed frameworks and existing types of data like conditional statements that can improve your Swift code. String interpolation is another effective general technique; this involves formatting strings in a more readable way so that it’s made up of several different variables and constants. Trim whitespace characters so that your code is leaner and so your code runs lightning fast. Finally, you should consider using boilerplate code where possible. Boilerplate code is designed to be reused; if you create several reliable examples of this code for your applications, you can code faster and dedicate more time to other tasks, like learning how to fix errors or how to write cleaner Swift code.
How long does it take to become a Swift developer?
The amount of time it will take to become a Swift developer depends on your experience level, your academic background and several other factors. As a general rule, though, it usually takes around 6 months to a year to learn all of the fundamentals of Swift development. If you don’t have any experience at all, it’s worth investing in a boot camp or an online course so you have a clear Swift learning pathway and have access to the expertise of experienced teachers. If you prefer, it’s possible to learn Swift on your own from scratch, but that will take loads of self-motivation and commitment.
Bear in mind that becoming adept at Swift is a long-term process, and it will take you longer to get to grips with more complex techniques like floating point literals, force unwrapping optional, using a fractional component, invalid conditions, handling optional chaining and multiple constants or dealing with error handling. Reading this article and applying the example source code we’ve listed above should help you better understand some basic and advanced Swift coding topics.
Where can I find more Swift code examples so I can write concurrent code more effectively?
Apple has a dedicated Swift resources page where you can find several examples of Swift code in real-world situations. You should also get involved with the Swift community. Since Swift is an open-source programming language, there are many experienced developers online who frequently share their applications and how they work. You can usually find these examples on code-sharing websites like Github or across dedicated forums.
If you work within an iOS development team, it’s also worth collaborating with your peers so you can solve problems together and collectively improve. Swift is a powerful programming language, but it’s at its strongest when you’re able to learn all its intricacies from other developers.
Is Swift code used outside of Apple development?
Swift has always been used primarily as a programming language for Apple applications on iPhones, Macs, iPads, and other Apple devices. However, a few years ago, it became possible for developers to use Swift on both Windows and Linux. This has created more use cases for Swift over time, including on the server side of development. Though it remains primarily an Apple coding language, learning Swift today can give you access to other development opportunities depending on the particular type of company you work for or your background.
What jobs can I get if I learn how to code with Swift?
Swift is an essential coding language if you’re hoping to work in iOS application development because the vast majority of apps designed for Apple devices use Swift code. This means if you’re hoping to work at Apple, you should also be very experienced in working with Swift.
Because of its widespread use, it can be possible to get an iOS development job if you only know Swift, and aren’t well-versed in other programming languages. However, if you want to build your skill set and become eligible for more positions, it’s worth also learning other languages common in web and mobile development. Some of the best supporting languages to learn in addition to Swift include Javascript, Python and Ruby.


