

Picture this: Your iOS app sails through Apple’s review process on the first try. No vague rejections, no late nights. Users download it, leave glowing reviews, and it runs smoothly on every Apple platform. Best of all? You built it with Swift, a language designed for speed and safety that dovetails nicely with Apple’s ecosystem.
But if you’re new to the Swift programming language, getting there can feel like fighting through a software maze. The documentation can be confusing and the debugging sessions endless.
This article is your scaffolding. Whether you’re an independent developer or working with a Swift app development company, we’ll break down Swift—the backbone of modern iOS apps—into clear, practical steps. You’ll see real-world examples and expert insights to help you code smarter and faster. Soon you’ll be building polished, App Store–ready applications like Paul Hudson on a good day.
What Is Swift App Development?
Swift app development is the process of writing iOS apps using Apple’s Swift programming language. It’s the fastest, safest way to build high-performance applications for iPhones and iPads. Swift’s clean syntax and strong type safety make it easier to catch bugs early and write maintainable code.
Here are the common frameworks and tools in iOS app development:
- Frameworks:
- SwiftUI: For building modern, declarative user interfaces.
- UIKit: For traditional app interfaces with extensive customization.
- Combine: For managing asynchronous events and data streams.
- Tools:
- Xcode: Apple’s official IDE for writing, testing, and debugging Swift code.
- iOS SDK: A suite of APIs and libraries for integrating Apple platform features.
Setting Up Your Swift Development Environment
Starting Swift development without the right setup can feel like wrestling with provisioning profiles. The tools can be confusing, and there’s no clear starting point. Let’s fix that. Here’s how to start coding for iPhone or Apple Watch like a WWDC pro.
Tools You Need
- Xcode: Apple’s official IDE, essential for writing code, designing the app’s user interface, and running simulators.
- iOS SDK: Includes libraries and APIs for building powerful iOS app development features.
- Swift Playgrounds: A lightweight tool for practicing the Swift programming language without creating a full project.
Creating a New Project in Xcode (Step-by-Step)
Follow these steps to start your first Swift app design Xcode project:
- Open Xcode and select “Create a new Xcode project.”
- Choose App template: Under iOS, select “App” and click “Next.”
- Configure your project: Enter the product name, select Swift as the language, and pick SwiftUI or UIKit for the interface.
- Set up version control: Enable “Create Git repository” to collaborate with the Swift community later.
- Run your app: Click the play button to launch the iPhone simulator and test your app.
Quick Reference: Common Xcode Shortcuts
| Shortcut | Action |
| Command + N | Create a new file (e.g., Swift file, Interface) |
| Command + Shift + N | Create a new project |
| Command + 1 | Show the Project Navigator |
| Command + B | Build the project |
| Command + R | Run the app on the simulator |
| Command + Shift + Y | Show/hide the debug area |
| Command + Option + Left Arrow | Navigate back in the editor |
| Command + / | Comment or uncomment selected lines |
| Command + Option + Enter | Show Assistant Editor (side-by-side coding) |
| Shift + Command + K | Clean the project (useful for fixing build errors) |
Mastering Swift Basics: Key Concepts Every Developer Must Know
Think of Swift as your programming language toolkit—powerful and essential for iOS app development. You’ll need to master these core concepts to write working Swift code and build high-quality iOS apps.
Swift Fundamentals
The table below covers the core ideas to make sure your work produces software that checks all the boxes.
| Swift Concept | Definition | Real-World Example |
| Variables | Named storage for values that can change. | var score = 0
score = 100 // Updates the score |
| Optionals | A type that represents either a value or no value. | var breakfastIncluded: String? = “Yes”
print(breakfastIncluded ?? “No breakfast included”) |
| Closures | Blocks of code you can pass and execute later. | let greet = { (name: String) in
print(“Hello, \(name)!”) } greet(“Alice”) |
| Protocols | Blueprints for methods or properties that classes must implement. | protocol Employee {
var name: String { get } func work() } struct Developer: Employee { var name: String func work() { print(“\(name) is coding”) } } |
| Delegates | A design pattern where one object acts on behalf of another. | protocol PhoneDelegate {
func answerCall() } class Assistant: PhoneDelegate { func answerCall() { print(“Answering the call for the boss”) } } class Boss { var delegate: PhoneDelegate? func receiveCall() { delegate?.answerCall() } } let assistant = Assistant() let boss = Boss() boss.delegate = assistant boss.receiveCall() // Assistant answers the call |
Understanding these basics is crucial because the Swift compiler uses them to catch errors early and optimize performance.
Building Your First App with SwiftUI and UIKit
Starting your first iOS app development project with SwiftUI or UIKit can be overwhelming—two frameworks and too many choices. This tutorial cuts through the confusion to build a simple to-do list app quickly.
Quick-Start Tutorial: To-Do List App
- Create a New Project: Open Xcode, choose “App,” name it, then select Swift and SwiftUI or UIKit. Choose your target device and configure the bundle identifier.
- Set Up Your UI: Use SwiftUI’s declarative syntax for quick layout or UIKit’s storyboard for visual design.
- Add Functionality: Write Swift code to create and delete to-do items using state variables or delegates. Here’s an example:
1import SwiftUI
2struct TodoItem: Identifiable {
3    let id = UUID()
4    var title: String
5}
6struct ContentView: View {
7    @State private var todos = [TodoItem]()
8    @State private var newTask = ""
9    var body: some View {
10        VStack {
11            HStack {
12                TextField("Enter a task", text: $newTask)
13                Button("Add") {
14                    let task = TodoItem(title: newTask)
15                    todos.append(task)
16                    newTask = ""
17                }
18            }
19            List(todos) { item in
20                Text(item.title)
21            }
22        }
23        .padding()
24    }
25}- Test Your App: Run the app in the simulator to check your progress.
- Refactor: Apply object-oriented principles to organize your code into reusable components.
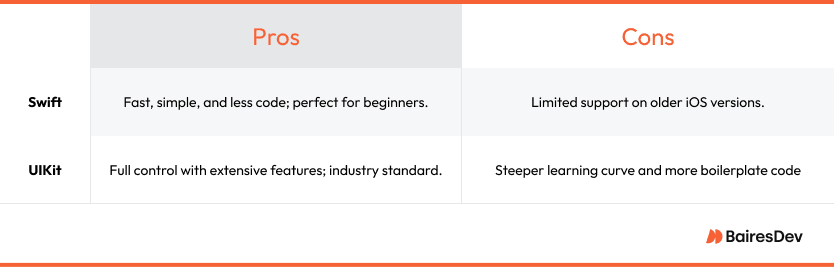
SwiftUI vs. UIKit Comparison
Common Beginner Pitfalls & Solutions
- Pitfall: Not using version control.
Solution: Commit changes regularly with Git. - Pitfall: Ignoring compiler warnings.
Solution: Address warnings—they often catch real issues early. - Pitfall: Poor state management in SwiftUI.
Solution: Use @State and @Binding properly.
Troubleshooting Common Xcode Errors
You’ve been coding for hours, hit ‘Build and Run’—and boom, Xcode crashes. Or worse, your app fails App Store submission. Here’s how to quickly fix these common iOS app development headaches.
| Error Message | Cause | Quick Fix |
|---|---|---|
| “Build Failed” | Syntax error in your programming language code. | Check error logs and fix syntax issues. |
| “No Matching Provisioning Profile” | Incorrect Apple Developer profile settings. | Ensure correct profiles in Xcode preferences. |
| “App Rejected” | Violations of App Store user interface guidelines. | Review and follow Apple HIG (Human Interface Guidelines). |
| “Xcode Crashed” | Overloaded project or simulator bug. | Restart Xcode, clear derived data. |
| “Command PhaseScriptExecution failed” | Broken build script. | Inspect and correct your build phase scripts. |
Breeze Through Your App Review
Nothing beats seeing your iOS app development project go live on the App Store on your first try. To misquote Linus Torvalds, “It’s like painting on a blank canvas, but with logic.” Here’s how to meet Apple’s standards and pass the review.
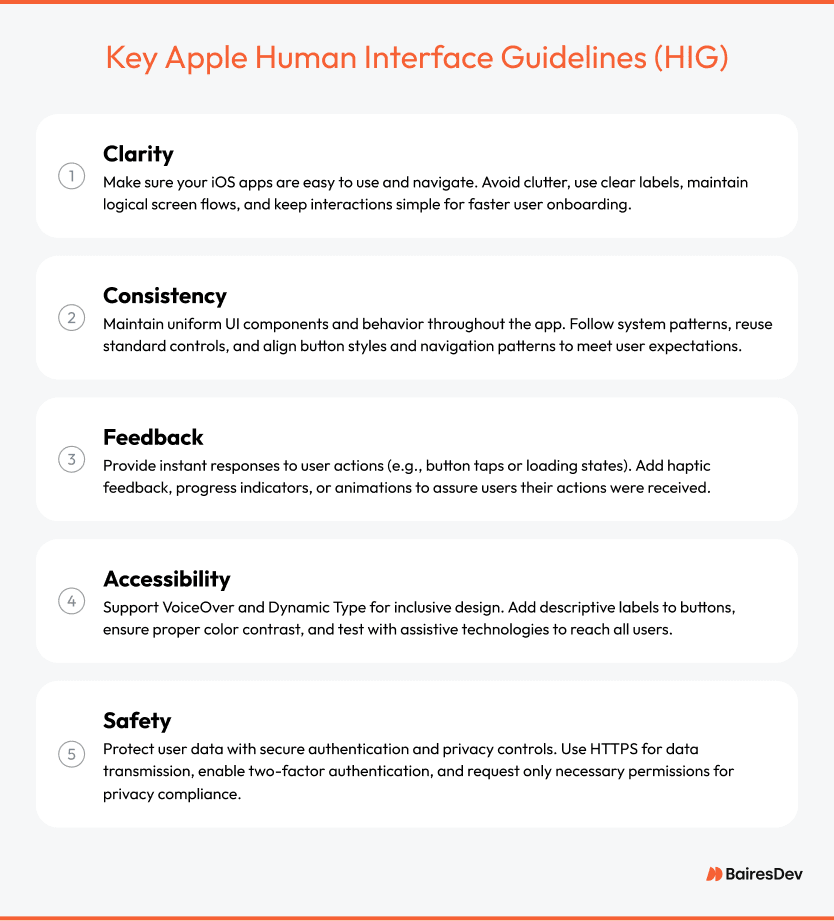
Key Apple Human Interface Guidelines (HIG):
Pre-Submission Checklist:
- ✅ Swift programming: Ensure code compiles without errors and passes all unit tests.
- ✅ App metadata: Accurate title, description, and keywords.
- ✅ Screenshots and previews: Showcase the app’s programming language interface clearly.
- ✅ Privacy policy: Include required privacy details.
- ✅ Testing: Verify performance on all target iOS devices.
- ✅ App Store Guidelines: Confirm compliance with Apple’s rules.
Advanced Swift Development Techniques
Tools like Core Data, Combine, and ARKit can put your iOS app development skills in the Sundell zone. Here’s how to use them to build richer iOS apps.
Mini-Tutorial: Integrating Core Data with SwiftUI
Core Data is a must-have for local data storage in Swift programming projects. Here’s how to add it to a SwiftUI app:
- Create a Core Data Model: In Xcode, add a new Data Model file and define entities.
- Initialize Core Data: Add a PersistenceController to manage the Core Data stack.
- Display Data in SwiftUI: Use @FetchRequest to retrieve data and show it in a list.
- Add New Entries: Use a form and .save() method to add items.
- Delete Entries: Implement .onDelete() on list rows.
Using Combine for Real-Time Data Updates
Combine simplifies handling real-time data streams in your iOS apps, such as live search or notifications. Combine’s publishers and subscribers integrate cleanly with SwiftUI’s reactive model, enabling new features like instant search filters or real-time progress bars.
A common pattern is to use @Published properties with @ObservableObject to bind data updates to your UI. For example, you can build a live search feature where the input updates the results instantly. Use .sink() to respond to published changes and update your views. This keeps your source code modular and easy to maintain. With Combine, you can build apps that deliver experiences without complex callbacks or delegates.
Here’s an example:
1import SwiftUI
2import Combine
3class SearchViewModel: ObservableObject {
4    @Published var query = ""
5    @Published var results: [String] = []
6    private var cancellable: AnyCancellable?
7    private let allItems = ["Apple", "Banana", "Orange", "Grapes", "Peach"]
8    init() {
9        cancellable = $query
10            .debounce(for: .milliseconds(300), scheduler: RunLoop.main)
11            .removeDuplicates()
12            .sink { [weak self] searchText in
13                self?.results = self?.allItems.filter {
14                    $0.lowercased().contains(searchText.lowercased())
15                } ?? []
16            }
17    }
18}
19struct SearchView: View {
20    @StateObject private var viewModel = SearchViewModel()
21    var body: some View {
22        VStack {
23            TextField("Search for a fruit", text: $viewModel.query)
24                .padding()
25                .textFieldStyle(RoundedBorderTextFieldStyle())
26            List(viewModel.results, id: \ .self) { item in
27                Text(item)
28            }
29        }
30        .padding()
31    }
32}
Exploring ARKit for Immersive Experiences
ARKit brings augmented reality to iOS apps, from measuring objects to interactive games. Inspired by Apple’s WWDC demos, use ARKit to place virtual objects in real-world environments or overlay information in AR scenes.
To build immersive AR experiences, use ARView to render 3D content and apply scene anchors for real-world positioning. Scene anchors help align virtual objects with physical spaces, enabling realistic interactions. With ARKit, you can create engaging apps that blend digital content with the real world, from interactive furniture previews to multiplayer AR games.
Quick Tips from the Developer Community
It’s refreshing when you build an iOS app that actually works. Here’s how to learn Swift and build iOS app development skills faster and smarter:
- Use YouTube tutorials: Watch videos by CodeWithChris or Sean Allen to shrink your Swift programming learning curve down to size.
- Break learning into projects: Focus on small apps, like a to-do list, to master specific new features and build confidence.
- Start with Swift Playgrounds: Practice coding interactively with Apple’s beginner-friendly tool for instant feedback.
Top Resources for Mastering Swift
- 📘 Paul Hudson (Hacking with Swift): Practical tutorials and “100 Days of SwiftUI” challenges.
- 📘 Angela Yu (Udemy): Highly rated Swift and iOS development courses with hands-on projects.
- 📘 Ray Wenderlich (Kodeco): A massive library of iOS tutorials covering everything from basics to advanced frameworks.
- 📘 Swift Forums: Stay in touch with the Swift community via these forums.
From Beginner to Published Developer
Mastering iOS app development takes practice, but now you know how to set up your environment and explore new features like Core Data and Combine. By this time tomorrow, you’ll be writing Swift programming like a young Donny Wals.
The best way to level up is through action. Use the Swift language to build projects and solve problems. Every expert started where you are now.


